Seed starting doesn’t have to be overwhelming and you can save a lot of money gardening by growing from seed. When it comes to getting your garden off to a strong start this spring, one of the most important (and sometimes overlooked) steps is ensuring your seedlings receive the proper light they need to grow strong and healthy. I remember when I first began my own seed-starting journey, I was overwhelmed by the choices and technical details. But with a little guidance, setting up grow lights properly can make all the difference between weak, leggy seedlings and vibrant, robust little plants.
In this comprehensive guide, I’m excited to share every detail about setting up grow lights, keeping them at just the right distance, troubleshooting common seed starting problems, and creating the ideal indoor gardening space.
Welcome to Grace Walk Farm, our family homestead in western NC. We share the highs and lows of our homestead journey, in hopes that it will encourage you to grow your own food too. Click here to grab our Beginner Garden Guide for free! Join our 600K strong Instagram community of homesteaders here. Thanks for stopping by!
Why Indoor Seed Starting with Grow Lights is Essential for a Thriving Garden
Starting seeds indoors gives you a head start on the growing season. In nature, sunlight is the powerhouse behind photosynthesis, and when you’re growing indoors, you’re replacing that natural light with carefully selected artificial grow lights. By investing in the right lighting setup, you ensure your seedlings get consistent, high-quality light, which is crucial for developing strong stems and vibrant leaves.
Indoor seed starting with grow lights allows you to control the environment—temperature, moisture, and light exposure—so that your plants get a robust start before they make the transition outdoors. This control means your garden can thrive even in the early spring or in areas with less consistent sunlight.
Choosing the Best Grow Lights for Seed Starting
Selecting the right grow lights is a key decision for any indoor gardener. There are two main types of grow lights widely used for seed starting: fluorescent lights (such as T5 fixtures and compact fluorescent lamps) and LED grow lights. Fluorescent lights are a classic option; they’re relatively inexpensive and provide a broad spectrum of light, which is great for encouraging healthy seed germination.
On the other hand, LED grow lights have gained popularity because they’re energy-efficient, produce less heat, and allow you to fine-tune the light spectrum. This customization is particularly beneficial during the seedling stage when blue light is essential to prevent your plants from stretching too far in search of sunlight. When researching your options, be sure to check for energy ratings, heat output, and spectral qualities to determine which type best fits your indoor gardening needs.
Click here to see the LED grow lights that I personally use and love.
How to Set Up Grow Lights for Optimal Seedling Growth
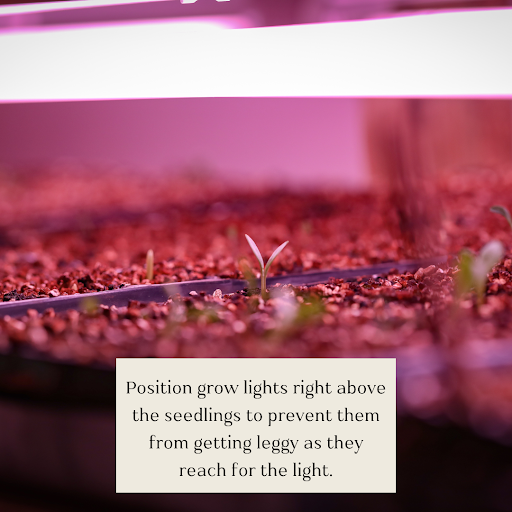
Once you’ve chosen your grow lights, setting them up correctly is essential for the health of your seedlings. The process begins with positioning your lights at the optimal distance above your seed trays. A general rule is to position them about 2 to 4 inches above the seedlings. Many experienced gardeners recommend using adjustable racks or shelves equipped with built-in tracks so that you can easily raise or lower the lights as your seedlings grow.
The goal is to provide your plants with consistent, direct light without causing heat stress. As your seedlings mature, they’ll need adjustments to keep the light intensity at just the right level, which means monitoring their growth closely and tweaking the setup accordingly.
Click here to see the adjustable shelves I use for my grow lights setup.
Managing Light Distance: Preventing Leggy Seedlings and Overheating
One of the most common challenges in indoor seed starting is managing the distance between your grow lights and your seedlings. Too close a light can lead to overheating or even leaf burn, while too far away can cause your plants to become “leggy” as they stretch toward the light. Leggy seedlings typically have long, weak stems and are a clear indicator that they’re not getting enough light. If you notice your plants becoming spindly, check the light distance and adjust accordingly.
A helpful tip is to observe the color and firmness of the leaves; vibrant green, sturdy leaves usually signal that your seedlings are happy. In contrast, if you start seeing brown or crispy edges, it might be time to raise the lights or adjust the angle so that the heat is more evenly distributed. Regularly monitoring your setup and being willing to experiment with different distances can help you find the perfect balance between light intensity and temperature.
Using Timers and Light Adjustments for Consistent Exposure
For indoor seed starting, consistency is key. Most seedlings benefit from receiving about 12 to 16 hours of light per day, which mimics a natural day-night cycle and promotes steady growth. Using a timer for your grow lights takes the guesswork out of your daily routine, ensuring that your seedlings get a consistent amount of light without you having to manually switch them on and off.
Start with a schedule of around 14 hours of light per day and observe how your seedlings respond. If you notice that the growth seems too rapid or the plants are stretching out, you may need to fine-tune the duration or the distance of your lights. Many indoor gardeners find that having the flexibility to adjust both the timer settings and the light height helps create an optimal growing environment that can adapt to the specific needs of different plant species. This level of control can significantly improve the quality of your seedlings, setting a strong foundation for their eventual transplant outdoors.
Temperature and Humidity: Balancing the Environment for Seedlings
While light is undoubtedly important, temperature and humidity are also crucial for successful seed starting. Most seeds germinate best in a warm environment, ideally between 65°F and 75°F. When using high-intensity grow lights, especially certain types of LED lights, it’s important to monitor the ambient temperature around your seedlings. Too much heat can cause stress, while too little can slow down the germination process.
Using a seedling heat mat can help maintain a consistent temperature, ensuring that your seeds have the warmth they need to sprout. Equally important is maintaining the right humidity level. Many gardeners cover their seed trays with a clear plastic dome or wrap for the first few days to create a mini-greenhouse effect.
This setup retains moisture and promotes faster germination, but once the seeds sprout, it’s essential to remove the cover to allow fresh air circulation and prevent fungal issues. Balancing temperature and humidity might require a bit of experimentation, but once you find the right conditions, your seedlings will thank you with vigorous growth and healthy development.

Troubleshooting Common Grow Light and Seed Starting Issues
Even with the best planning, every indoor gardener faces challenges along the way. One common issue is overheating caused by grow lights placed too close to the seedlings. Signs of heat stress include discoloration, brown spots, or crispy leaf edges. If you notice these symptoms, try raising the lights or adjusting their angle to spread the heat more evenly across the tray.
Another frequent challenge is uneven growth, where some seedlings thrive while others lag behind. This can often be attributed to uneven light distribution. Rotating your seed trays every few days and using reflective materials—like aluminum foil or reflective paint on the walls of your growing area—can help ensure that all seedlings receive equal light exposure. If your plants are growing too quickly or becoming leggy, it may indicate that they’re not getting enough light intensity, prompting you to lower the lights or extend the duration of exposure.
Keeping a detailed journal of your observations and any adjustments you make can be an invaluable tool in troubleshooting these common issues, ultimately leading to a more successful seed starting experience.
Maximizing Energy Efficiency with LED Grow Lights
Energy efficiency is a significant consideration for many indoor gardeners, especially those who plan to start seeds every season. LED grow lights have become a favorite among indoor gardeners because of their energy-saving benefits and lower heat output compared to traditional fluorescent lights. Although the initial cost of LED lights may be higher, their longevity and reduced energy consumption can lead to substantial savings in the long run.
Additionally, LED grow lights offer the advantage of customizable light spectrums, which allows you to tailor the light output specifically for the seedling stage. This customization helps prevent common issues like leggy growth and overheating while promoting a more balanced development.
When setting up your grow lights, it’s worthwhile to research different LED models and read reviews from other gardeners who have used them for seed starting. By investing in energy-efficient technology, you not only contribute to a more sustainable indoor gardening practice but also create an environment that’s perfectly tuned to your plants’ needs.

Setting Up a Dedicated Indoor Gardening Space for Seed Starting
Creating a dedicated indoor gardening space can make all the difference in achieving consistent seed starting success. Whether you convert a spare room, set up a corner in your basement, or even repurpose a closet, having a dedicated area allows you to control environmental factors such as light, temperature, and humidity more effectively.
A well-organized seed starting station can include adjustable shelves, movable racks, and storage for all your supplies—from seedling trays and potting soil to grow lights and timers. By designing your space with flexibility in mind, you ensure that you can easily adjust your setup as your seedlings grow and as the seasons change.
A designated indoor gardening area also minimizes disturbances, allowing your plants to benefit from consistent conditions day in and day out. Plus, it creates a pleasant and efficient workspace that can inspire your gardening journey and make the process of starting seeds both enjoyable and rewarding.
Success with Indoor Seed Starting and Grow Lights
Setting up grow lights for seed starting is both an art and a science. It involves carefully selecting the right type of light, positioning it at the optimal distance, managing temperature and humidity, and being ready to troubleshoot common issues. As you become more familiar with your grow light setup and the specific needs of your seedlings, you’ll find that the process becomes increasingly intuitive.
Every adjustment you make—whether it’s raising the lights by a few inches or fine-tuning the light duration—brings you closer to creating the perfect indoor garden. Remember that every seed you plant is a promise of future abundance, and with the right care and attention, your seedlings will grow into a lush, vibrant garden.
Gardening is a journey of continuous learning and experimentation. There may be challenges along the way—overheated leaves, leggy growth, or uneven development—but each hurdle is an opportunity to learn and improve your techniques. Keep a gardening journal to record your observations and adjustments, and don’t be afraid to try new approaches. Whether you’re a seasoned gardener or just starting out, the key is to remain patient, observant, and adaptable. With persistence and care, you’ll be rewarded with healthy, robust plants that are ready to flourish once they transition outdoors.
By investing time and energy into setting up your grow lights and creating a nurturing indoor environment, you’re laying the foundation for a successful garden season. From selecting the best lights and positioning them for optimal growth to managing environmental conditions and troubleshooting common issues, every detail counts.
Happy planting, and here’s to a successful, fruitful spring garden filled with strong, healthy plants that began their journey right under your carefully positioned grow lights. Embrace the process, learn from every challenge, and most importantly, enjoy the rewarding experience of watching your seeds transform into thriving, green life.
Grow a Better Garden This Year
If you’re serious about growing food for your family, this is for you. Garden School is for the student who is ready to replace the grocery store and start producing veggies and herbs at home. If you are ready to get serious about self-sufficiency, this course will provide you with step-by-step help to tackle soil heath, pest control, weed maintenance, seed saving, and much more. Click here and start today!
Also check out these blogs:


